Increase your productivity by utilising the Automatic Rostering functionality to auto-fill shifts and decrease your admin tasks.
IN THIS ARTICLE:
Overview
The Automatic Rostering feature allows you to auto-fill shifts from specific User Groups or Role Offers.
Automatic Rostering is based on user availability and will fill shifts based on the settings, such as max hours per week or minimum gap between shifts.
Note: Automatic Rostering does not consider factors like user experience or equal allocation of shifts.
Prerequisites
Before you can utilise the Automatic Rostering feature, it is essential to complete the following steps:
- Set-up the required User Groups / Role Offers
- Created the relevant Event and Shifts
- Updated your Organization Settings > Event tab, below are the relevant settings.
Automatic Rostering Settings
There are a number of Event settings that are relevant for Automatic Rostering, these are explained below.

Maximum amount of hours Users can work
This feature enables you to specify the maximum number of hours that a user is permitted to work in a single day or over the course of a week.
To impose a limit on the total hours worked by users, simply click +Add. By default, this setting allows for unlimited working hours.
Note: The week calculation is made using the first day of week defined in the General Settings.
Gap between Shifts in minutes
This setting allows you to set the minimum time required between shifts. A time of 0 will allow overlapping shifts.
Auto Rostering Tolerance
This option allows you to set a tolerance for the Auto Rostering, that will be the amount the system will ignore the users availability at start and end of shift times when allocating shifts.

Note: Tolerance capability is available between 0 and 60 minutes. A positive figure will mean the user will be available an extra amount.
The amount entered impacts both start and end times.
Spread user allocation across Shifts when Auto Rostering
This feature modifies the automatic rostering process by distributing users across multiple shifts simultaneously, rather than completing one shift before proceeding to the next. This approach helps ensure a more balanced allocation of available users across all shifts, promoting efficiency in shift coverage.
For instance, consider a scenario where three overlapping shifts require five users each. With only ten users available, employing the spread feature allows for an even distribution of user allocations across all shifts, ensuring that even the last shift has sufficient coverage with some users assigned.

Note: If you are unable to see these Event Setting and have full admin access, please contact Rosterfy Support for assistance.
Automatic Rostering
Once you have completed all the required prerequisite steps, you can start using Automatic Rostering, follow the simple steps below:
- Navigate to Events > Events.
- Locate the Event you would like to roster, select View Shifts.
- Click the selected shifts you want to auto roster or you can auto roster for all listed shifts., then select Actions > Automatic Rostering.
- A pop-up will be displayed, here you can select the following fields based on whether you want to roster users from a User Group or from a Role Offer.
User Group Automatic Rostering:
Complete the following fields:

From: Select User Group.
User Group: Select the specific User Group.
Status: Select the Shift User Status you want to give to the users being rostered.
Skip Users already rostered: Ticking this option will bypass any users that have already been rostered onto shifts for this event.
Apply To: Choose whether to apply the automatic rostering to All listed Shifts or Selected Shifts.
Once you have updated all the options, the number of shifts being updated will show, then select Import, a pop-up will appear asking you to confirm the number of shifts being updated, click Yes.
Role Offer Automatic Rostering:
Complete the following fields:
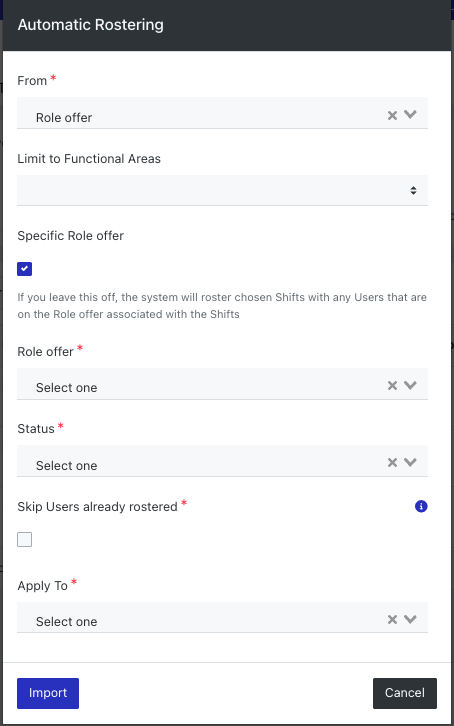
From: Select Role Offer
Limit to Functional Areas: Select a specific Functional Area, if applicable.
Specific Role Offer: Tick this if you wish to select a specific Role Offer, rather than the Role Offer associated with the Shifts.
Role Offer: Select which Role Offer you would like to roster based on,
Status: Select the Shift User Status you want to give to the users being rostered.
Skip Users already rostered: Ticking this option will bypass any users that have already been rostered onto shifts for this event.
Apply To: Choose whether to apply the automatic rostering to All listed Shifts or Selected Shifts.
Once you have updated all the options, the number of shifts being updated will show, then select Import, a pop-up will appear asking you to confirm the number of shifts being updated, click Yes.